Your Custom Text Here

Reframing Movement Through Alexander Technique
Ann Rodiger joins Allison Lindsay on The Embodiment Podcast to talk about Alexander Technique, shifting our spatial awareness, creating space in our bodies and finding a sense of inner movement, how Alexander Technique can support those with hypermobility, finding three-dimensionality in our embodiment and ways to allow better posture to emerge.
Ann Rodiger joins Allison Lindsay to talk about Alexander Technique, shifting our spatial awareness, creating space in our bodies and finding a sense of inner movement, how Alexander Technique can support those with hypermobility, finding three-dimensionality in our embodiment and ways to allow better posture to emerge.

Awareness Games that Lead to Wellness through Mind-Body Integration
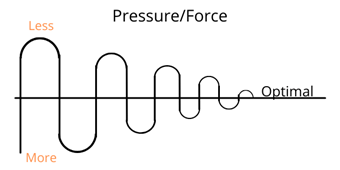
These three games are fun to play with musicians as they help build awareness of habits the musician has and what other options might be available. The games are based on the concept of pendulation where the musician discovers optimal balance, force, and performance presence while playing. They are fun games to repeat and often useful at the beginning of a lesson or when students begin to develop detrimental habits.
These three games are fun to play with musicians as they help build awareness of habits the musician has and what other options might be available. The games are based on the concept of pendulation where the musician discovers optimal balance, force, and performance presence while playing. It is a fun game to repeat and often useful at the beginning of a lesson or when students begin to develop detrimental habits. In each game it is helpful to go slowly enough to build awareness of the physical sensory experience of the ends of the pendulation and then the middle and most likely optimal moments we want to cultivate.
Game I: Finding the Best Posture and Balance
This game is helpful for musicians who stand mostly on one leg, tilt in one direction, or twist in one direction more than the other, for instance. Balancing on one leg is used as an example for the game. and can be applied to any other circumstance where improvement is needed.
Stand on one leg completely. Slowly move to the other leg completely. Keep the hips, knees, and ankles easy. Slowly move back and forth between the two supports diminishing the amount of shift from side to side until there is very little sideways movement. Find the moment when there is equal support on both legs. This can be done while standing on two supports or on the sit bones while at the keyboard or drums.
It can first be done without any contact with the instrument. Then while supporting or contacting the instrument, while playing scales, and then while reading music.

Game II: Playing with Optimal Force
This game is best for those who use their arms and fingers to play an instrument. Using the drums as an example, experiment with how little and how much force it takes to produce sound. Or with a flute, how much and how little pressure it takes to close a finger hole.
While exploring your airflow, avoid squeezing your throat and larynx so you stay healthy.
Game III: Performance Presence
This game is especially useful for musicians who get nervous in front of others while playing. The goal is to include the musician in the spatial field of the practice area, performance area, or stage. It is also useful for ensemble and choral work.
Start by noticing only oneself in the room and then pendulate out to notice only the perimeter of the room. Gradually move back and forth between each extreme until both can be held in focus at one time.
A variation: You can also begin by noticing oneself only and then adding small increments of space, e.g. oneself and 3 inches away, oneself and the other musicians in the room (if developing ensemble work) oneself and the middle of the room, oneself and the surrounding walls.

All of these games have multiple variations and applications. This type of self awareness and discovery are helpful in teaching students that there is not only one way to make music. It cultivates a sense of discovery and curiosity and gives self agency to the musician.

Finding the Ground
Listen to this one minute check-in to practice staying with yourself and finding the ground during this time of ongoing change. The more we inhabit our bodies and allow ourselves to physically experience how we respond to uncertainty and anxiety, the more we are able to participate in the process of transformation.
Listen to this one minute check-in to practice staying with yourself and finding the ground during this time of ongoing change. The more we inhabit our bodies and allow ourselves to physically experience how we respond to uncertainty and anxiety, the more we are able to participate in the process of transformation.
Using Alexander Technique with Hypermobile Dancers
NDEO’s Guest Blog Series features posts written by our members about their experiences in the fields of dance and dance education. We continue this series with a contribution by Ann Rodiger, Founder and Director of Balance Arts Center. Guest posts reflect the experiences, opinions, and viewpoints of the author and are printed here with their permission. NDEO does not endorse any business, product, or service mentioned in guest blog posts. If you are interested in learning more about the guest blogger program or submitting an article for consideration, please visit this link.
Using Alexander Technique with Hypermobile Dancers
By Ann Rodiger, Founder and Director of Balance Arts Center
As a former loosey-goosey bendy dancer, who has since had two hip replacements, I want to spread the word about how to be alert to and work with dancers with hypermobility. While teaching in several major university dance programs, I recognized that flexibility is frequently praised and coveted, sometimes at the expense of the dancer’s health, wellbeing, and longevity. The Alexander Technique as applied to teaching dance can go a long way toward preventing and reducing injury.

Photo by Heather Gardner
What saved me from damaging my joints was the study of the Alexander Technique (AT) where I learned to limit my range of motion and find a positive sense of containment. I gained an embodied understanding of counterdirection and subtle recognition of when flow and direction were impeded by locking or bracing my joints. Basically I was overdoing everything and needed to dial back both the tension and pressure on the joints. My dancing improved dramatically when I did less and learned how to inhibit the desire to do more and more. I learned how much my thinking and intention affected my movement.
One of the concepts in the Alexander Technique that is directly applicable to dancers is the paradigm for the body’s structure that is a combination of the outward and inward push and pull oppositional forces. The biotensegrity paradigm for the body promotes spatial thinking that leads to direction, flow, and line rather than looking for shape, position, or specific muscular engagement. This is particularly helpful to those with hypermobility.
Biotensegrity inherently offers the ideas of suspension, full-body involvement in every motion, and uses “throughness” for stability. This model for the body’s structure adapts to every “position” the body can take through gravity, the ground reaction force and dimensional suspension.

Photo by Heather Gardner
The first step in identifying if you have any dancers with hypermobility is to recognize some of the clues of the hypermobile spectrum. It can be tricky to identify because the presentation of hypermobility is rarely the same in two people. At the same time it is important to notice and acknowledge that hypermobility can be a systemic connective tissue disorder that may involve the vital organs. For someone who has one of the Ehlers Danlos Syndromes (EDS), a genetic condition where there is no cure, movement and pain management become paramount.
If you suspect one of your dancers is hypermobile, it is helpful to take them aside and gently ask them if they have considered that they might be hypermobile. You can refer them, without alarming them, to their doctor to get checked out in case it is something they should know. You can also do the Beighton Hypermobility Assessment to see where your students fall on that scale. Performing this test with everyone could also let you, as their teacher, know about their mobility.
The following are some specifics to consider with your dancers.
Some of the hypermobile manifestations include:
Hyperextended knees
Hyperextended elbows
Repeated sprains and strains
Problems with balance and stability
Subluxations or dislocations of joints, articularly shoulders and hips
Too tight and too loose at the same time
How to coach a dancer who is hypermobile:
Recognize that more range of motion is not always better.
Encourage the dancer to balance with direction, flow, and “throughness” rather than bracing and leaning on the joints for stability.
Consider the whole body in every movement.
Use language as a teacher that encourages both inward and outward directions simultaneously. For example, if you say “reach your arm as far as you can” that may be promoting going too far and may even pull the shoulder out of the socket. You could say, “sense the length of your arm from your fingertips to your shoulder and from your shoulder to your fingertips while your elbow and wrist are easy.”
Recognize that familiar language has different meanings for different dancers. For example, “straighten your legs” may cause the hypermobile dancer to press into the ligaments at the back of their knee causing pain and an even greater range of motion. You could say, “lengthen our legs” instead. This will help provide a sense of containment and spatial clarity.
Words/phrases to avoid:
Straighten
Hold
Make ____ shape
Use more force
Tighten your ______
Hang or dangle
Reach
Release
Words/phrases to utilize:
Lengthen
Release into your direction
Sense the oppositional flow
Balance
Sense the motion in your body
Sense gravity and the rebound moving through you
Now, as an Alexander Technique teacher for nearly 40 years, I continue to see on a daily basis that working with the AT principles and the inherent concepts of building awareness, paying attention to the how, inhibiting detrimental habits, thinking of useful directions, can affect dancers, and everyone, giving them more comfort, balance, ease, and longevity.
Visit www.balanceartscenter.com/hypermobility-eds for more information, free classes, and resources about hypermobility and the Alexander Technique.
Click here to view this blog on NDEO’s Behind the Curtain page!

A 10 Minute Lie Down for your Voice & Breath!
This 10 minute guided lie down allows you to bring awareness to your body, your breathing, and how you begin to make sound. It is filled with useful ideas to include in your preparation and recuperation from speaking and singing.
This 10 minute lie down focuses on your breath and voice. Vocalists, speakers, teachers, and anyone who uses their voice can benefit from this lie down.
Play audio to below for the guided lie down with Ann Rodiger, or read through the instructions on your own.
Leave a comment below and let us notice what you experienced!
Transcribed Audio Lie Down Instructions
By Ann Rodiger
Hi, my name is Ann Rodiger from the Balance Arts Center in New York. Here’s a 10 minute lie down for your voice and breathing.
Put yourself on your back on the floor with your head on a little book, so that your neck still has its natural curve, and you can let your head weight balance on your book. Bring your knees up so your feet are flat on the floor. And keep your legs fairly parallel, so if you were standing your feet would be underneath your hips. Bring your hands onto your abdomen, and your elbows out to the side.
Notice your body weight on the floor, let the parts of your body that are contacting the ground soften and spread out.
Start to notice your breathing.
Notice how you’re inhaling, and notice how you’re exhaling.
As you breathe in the next time, close your lips, and let the air come in through your nose. Notice that the air can come up behind your eyes and go toward the back of your head, behind your tongue, as it goes through your neck and down into your torso.
As the air goes out, let it return along that same pathway. So for the moment you’re breathing in and out through your nose.
Let your eyes go back in your eye sockets.
Check in with your weight on the ground.
This time as you breathe in, let the air come in again through your nose, notice that it can go up behind your eyes, down behind your tongue, which is wide and easy, and notice that the air can go down all the way toward your diaphragm, and that the movement of your diaphragm goes down toward your pelvic floor.
Notice that as you breath out everything softens.
This time as you breathe in, notice that the air can help you define the length of your torso, as well as the width and the depth.
And as you breathe out and let the air gently move out, make sure you keep the sense of length and width and depth.
Do that again, breathe in, notice your full length, you’ll also notice that your legs start to release and you’ll feel your feet on the floor more clearly
Allow your ribs to move, allow your sternum to move, allow your abdomen to move, and notice that the main event though, the direction that you’re noticing, is your length. Your ribs also move out to your sides.
Check in with your weight in the floor. Notice too, that as you breathe you can sense your weight more clearly on the ground and you might feel heavier.
Notice that you can breathe like this for a moment or two. And allow the air to come in and out of your body easily and gently. Meaning there’s no pulling of the air in and there’s no pushing of the air out.
You start to let your body breathe you.
You can take all the cues for the inhale and exhale from your own body.
As you’re breathing in continue to soften your jaw, your tongue is wide, it’s high in the back, it’s easy. You continue to notice that the breathing softens your ribs, and gives you more length, width, and depth.
And you also notice you have the natural curves in your spine.
On the next exhale let the breath come out of your mouth. So you let your jaw open a little bit, you release your tongue, and you let the exhale come out of your mouth. And then as you breathe in you close your mouth so the air comes in through your nose identifying your length again.
Repeat that.
So you let the air go out easily through your mouth, after it touches your soft palate, it comes out over the top of your tongue as it exits your body.
On the next exhale let yourself make an “E” vowel, gently and easily. Put a little H in front of the “E” so the air moves first before you actually phonate.
All your inhales are done with closed lips so the air can come in through your nose and help you release again into your 3-dimensionality.
On the next exhale say all of your vowels. Say “He Hay Haw Ho Who”, all in one breath.
Breathe in easily, and then do that again.
Notice that you can say your vowels with your weight in the floor.
Notice that you can start the phonation without pushing on the air. Use the air to make the sound that’s in the back of your mouth above your tongue.
Now count to 10 on the next exhale, all in one breath. If you feel like you’re starting to run out of air and breath, focus on your length and ease in your tongue, and jaw, and mouth. Let your body responds as it needs to. And then close your lips on the next inhale.
Repeat that again.
Now speak a phrase like, “hello how are you?”
Make sure that as you speak the words, your body weight is still on the ground, and this time you’re also sensing the vibration in your bones, of the sound, as you phonate.
Go back to an easy breath through your nose.
Think through al your directions: your weight on the ground, your 3-dimensionality, the easiness of your eyes, easiness of your jaw, your tongue, your throat.
Notice that you can sense the space around your body and the space in the room.
This time count to 10 again and notice you can sense the whole space around you while you’re counting to 10.
And complete your lie down by doing one more check and scan of your whole body so you can release anything that has become tense or has interfered with your vocal production.
Come to standing and walk around.

You are the Instrument! How to Use the GAP as Preparation for Performance & Practice.
A musicians’ well-being begins with themselves! As a musician, you are the main instrument in your music making process. Your basic body posture and balance and your continued ability to respond dynamically throughout playing is critical to remaining injury free. Try the practice in this blog to prepare yourself for practice and performance!
A musicians’ well-being begins with themselves. As a musician, you are the main instrument in your music making process. This is most obvious with voice students as there is no external instrument. However, it is equally important for all musicians.
Your basic body posture and balance and your continued ability to respond dynamically throughout playing is critical to remaining injury free. Taking the time to cultivate healthy postural habits throughout your learning process will serve you throughout your lifetime of playing and performing.
Working on postural and balance fundamentals before injury or pain occurs is significant to the musician’s success.
The more you observe the nuances of movement in yourself and perhaps your students, the more available you will be able to respond appropriately and adapt to the needs of the musical instrument and the music making. Maintaining dynamic balance requires continued recalibration of the muscular tone so that connection and flow throughout your body is available.
A starting place is to attend to the moment before you begin to play. Begin each lesson, practice, or performance with a pause, a GAP - Give A Pause. Allow yourself to find your best balance and use of your body before you approach the instrument. Make sure your breath is moving.
How to Use the GAP as Preparation:
Musicians who play while seated can do this process while sitting. If you stand to play or sing you can do this while standing. Musicians who support instruments can pause prior to bringing the instrument up to playing position.
Allow yourself to find the best balance and use of your body before you approach the instrument or make a sound.
During the pause explore thinking through each of the ideas below. Notice how your body responds, how your awareness changes, and anything else that comes up.
Sense the floor and ground underneath the supporting body parts (this does not mean to go passive or collapse on the ground.)
Notice the rebound and length in your body that can be felt as a response to gravity.
Allow your body to respond to the breathing process.
Allow for freedom in the joints of your body and notice how that helps improve all of the above points.
Notice what you noticed as you went through those ideas.
Then continue with these more specific ideas in your GAP:
Allow your head to balance (not be held) above the base of support (feet if you’re standing or sit bones if you’re sitting).
Allow for the natural curves of your spine to be present.
Sense the 3-dimensionality of your entire structure; length, width and depth.
Allow your head, neck, and back matrix to be the main support for your body so that the arms and legs are free to move as needed.
If standing, make sure the hips, knees and ankles are free and unlocked.
From this place of using the GAP as Preparation, begin to play, sing, or bring your instrument up and notice how you sense this process.
The balance and ease that emerges from using the Pause as Preparation will become a new baseline of use that you can return to before you start playing, at the end of phrases, and during moments of rest.
With repeated practice, this baseline will be refined and eventually become habitual. In this way you can recuperate by releasing any excess “doing” you have accumulated while playing.
This process can lead to a more easeful and coordinated organization from which to begin playing again.
What do you notice? Drop a note in the comments about how you experience this process.
To practice these ideas in action join our Spring Intensive coming up this April 17 & 18!
5 Tips for Successful Posture and Balance
How you approach your movement and posture has everything to do with how successful you will be in finding and maintaining ease and pain-free movement.
Click here to read our 5 tips for successful posture and balance!
How you approach your movement and posture has everything to do with how successful you will be in finding and maintaining ease and pain-free movement. It can be tempting to put your head here, your hips there, and shoulders someplace else and then try to maintain that shape or look. You will be more successful, and feel better, if you recognize you are a dynamic organism made to move. You can and need to constantly allow your body to adapt to the requirements of your activities.
These are not your ordinary postural tips.
These are ideas and concepts that will guide you to better and easier movement you can refine and maintain. You are not going to be guided into a “shape” or specific “stance” rather you will be guided through principles and thinking to allow your better posture to emerge. These principles underlie all good posture and movement and are fundamental to all you do.
These tips will help you understand how to apply your thinking and mind to your posture so you learn to let your body support you in all your actions. They are ideas you can use again and again to keep you balanced and moving easily in any situation. As with any mindful practice they take time to master. Give yourself time. Be deliberate in your posture practice.
1. Build Awareness
Noticing what you notice about your thinking and movement patterns is the starting point for change. What are you aware of now? What parts of your body do you sense? Do you feel balanced? What movements are easier than others? What stimulus intensifies your habits and what helps you let them go? Anything you notice, large or small, is useful. This tuning in to yourself, your thoughts, and your movement will help you direct yourself into better posture and balance.
2. Allow for Flow
Movement flow is happening throughout your body when you are still and while you are traveling through space. For instance, notice that when you walk and then stop moving through space you can still sense the internal movement flow inside your body. You can also learn to sense the movement of your airflow in your fingertips and toes. Cultivate and allow for an awareness of your body’s flow as you go throughout your day.
3. Sense the Space
Occupy your own space by sensing the space inside your body. Notice the relationship of your body parts, for example, shoulder to shoulder, or head to feet. This awareness will help you find your three-dimensionality. Then let yourself perceive the space around you into the environment. Sensing your head to the ceiling or distance from your head from the phone are both good places to start. This will help you locate yourself in space and give you a literal sense of perspective.
4. Throughness is the Key
Sensing the space inside and outside your body simultaneously will lead you to a sense of throughness and connectivity with yourself and your environment. Throughness will help you maintain your flow, mobility, and ease of movement. It will allow your body to adapt to movements in a dynamic and responsive manner. As you release your body, notice you can collapse or you can open into a throughness of flow that gives direction, support, and presence. Throughness is more important than the shape you are making.
5. Ease into Change
As you reorganize your posture and coordination you will be redistributing the muscular tone in your body. Muscles that have been underutilized will come on line while those that have been overworked to do less. Allowing change to occur gently and over time helps make postural changes smooth and familiar.
Use this process for change:
Pause and do less.
Think spatially.
Allow for a response to your thinking.
Readjust yourself gently into a better organization.
Join us for 2 virtual workshops that allow you to put these posture ideas into practice.
To integrate these ideas into your meditation practice register for our Posture for Meditation Virtual Workshop on Saturday, February 20th 3-6pm ET. And, to explore and embody the concepts in relationship to your work-from-home set up, jump in our 2-part Virtual Ergonomics Class on Monday February 22nd and March 1st, 6:30-7:30pm ET. Click here to sign up!
We look forward to seeing you soon!